Precision Shooting 1-Part 1: The Basics of Your Rifle
As you are probably aware, rifles are built from several components. These components in general, usually consist of a rifle stock, barrel and receiver and as with other mechanical devices in our lives, such as cars, trucks, airplanes and bicycles, your rifle must be maintained.
You would probably not ride a bicycle with loose wheel nuts. This would obviously cause the wheels to wobble, come loose, lead to other problems and perhaps even fall off. On the other hand, a person would not assemble the wheels too tight either. This is because the bearings in the wheels could quite possibly bind. The point here is that the components of your rifle need to be assembled and kept at the manufacturer’s specifications.
One day while at the range I was shooting an extremely accurate 6mm Remington that I built specifically for prairie dog hunting. However, instead of shooting 1/8” groups at 100 yards, they had opened up to ¾”. I sat there and contemplated what was causing this. I thought about my hand loads, the way that I was holding the rifle and a myriad other voodoo possibilities. However, even though I checked the receiver screws and scope ring nuts before I left, I went through my procedural check list and checked them again. So I took out my Seekonk “T” handled torque wrench and did so. I was surprised to find that the receiver screws turned ever so slightly. I put the wrench away and sat back down at the bench. Focusing on the target I pulled the trigger and the problem was solved. Now, it could have been a super clean barrel, fatigued scope, or several other problems, however this did appear to solve the problem and the gun was back to shooting 1/8” groups again. Actually, this happened in front of my Son in law “Brady” the day that we went shooting after Thanksgiving. The lesson here is that a torque wrench is an imperative piece of kit for your rifle system.
In addition to keeping your rifle “tuned” to the manufacturer’s specifications, there are other attributes that contribute to your rifle shooting its best. These include the following:
1) Bedding the rifles action to a good stock
2) The length of trigger pull (length of stock)
3) What you should know about your barrel
4) Good scope mounts
5) Rifle Scope
6) Cleaning Equipment and methods
There are several if not many different factors that affect the trajectory of the bullet; and the rifle stock is one of them. Rifle stocks are made from different types of materials for different reasons and different kinds of shooting preferences. A bench rest shooter will want a stock that fits into their shoulder comfortably while sitting up at a bench while a Tactical shooter will want a tactical stock that is built so that both a left handed or right handed shooter can use it in the field and the stock fits into their shoulder when lying prone or while in a sitting or kneeling position.
“Cast off” means that the stock will sit slightly inward of the rear of the but end of the stock. What this does is make it easier and more comfortable for the shooter to get his eye into the scope without stretching his neck out uncomfortably to do so. The “comb” is the top part of the but of the stock where your cheek lines up with the scope. It is not the cheek piece; however it is used to align your eye with your scope. A downward comb, (a comb that slants down towards the rear of the scope) is a preventative measure that prevents your cheek bone from being slapped by the stock as a result of felt recoil. Both cast off and comb were common in the wooden Weatherby stocks as well as shotgun stocks.
Mr. Bill Sheheen manufactures “The” most beautiful and stable wooden laminated stocks in the world. The lamination of the wood gives it great strength and makes it less subject to the affects of weather changes. Weather, such as humid, wet environments can cause non-laminated wooden stocks to warp and twist; and when this happens, it obviously will change the point of impact of the bullet.
Fiberglass stocks are not all that affected by the weather. They are super strong, and take the hits, drops and abrasive use of field use. In both cases, unless otherwise noted, stocks need to be “bedded”. HS Precision manufactures a super stock that comes with aluminum pillar blocks built into it. They suggest not adding any bedding as the shape of the aluminum pillars has a slight “V” in them. When the action is torqued down to the specified setting, it is held into place. Other manufacturers such as McMillan, also manufactures an excellent assortment of fiberglass stocks. If you send them your barreled action they will bed it for you at an additional charge.
The “bedding” can be done by your gunsmith (recommended) or yourself and consists of a special epoxy type of substance that you lay into the specified area of your stock.
Bedding your action will prevent the barrel and receiver from shifting during firing, thus keeping the action static and as constant as possible. This means that the impact of the bullet will theoretically hit close to the same place every time the rifle is fired.
Glass Bedding
Bedding your rifle achieves several goals; 1) Elimination of undue stress on your barrel and receiver, and 2) restriction of any lateral movement of the action relative to the anchor points at the time of ignition. If any movement occurs, the harmonics of the entire assembly (barrel, receiver and stock) will change along with the point of impact. It is imperative that the arrangement is kept as constant as possible and bedding your rifle is one step in achieving this.
Only the barreled action area of the stock should be glassed. This includes the area in front of the recoil lug, the back area of the recoil lug, the tang and the trigger guard where the screws pass through and can be accomplished in one step. But, do not add bedding compound to the bottom, sides or front of the recoil lug cavity. This may appear to be somewhat excessive, however when utilizing a wooden stock, once the bedding has cured, the trigger guard should also be glassed. The curing process takes approximately ten days. I would just assume letting your gunsmith take this on.
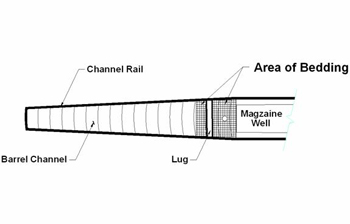
Top View Of Stock

Floating the Barrel
To “Free Float” the barrel means that the barrel does not touch any part of the barrel channel. The barrel channel and action area should be sufficiently larger than the running diameter of the barrel and action. This allows for better cooling of the barrel and also prohibits moisture build up in the stock as well as the collection of solvents that could cause the stock to warp. Warping, as previously mentioned, will change your zero.
Free floating the barrel basically involves opening up the Barrel Channel so that the barrel will have a minimum of 0.05 inch clearance. You can do this yourself by using a large wooden dowel and wrapping it with sand paper. You must make sure that it isn’t too large or you will open it up more than you want. When you are done, seal the sanded area with an epoxy mix. However, I recommend a competent gunsmith for these processes. They can hopefully be found in your area or through the stock manufacturers.
Length of Trigger Pull
The length of trigger pull is another variable that aids the shooter by customizing their settings so that the shooting position is not just more comfortable, but allows the tip of the finger (only) to be placed on the trigger. The length of trigger pull for shotguns is measured from the inside crease of your arm to the first crease of the first knuckle of your index finger. (When firing, the trigger should be pulled straight back.) If more than the tip of the finger is used, and the trigger is not pulled straight back, your finger can actually slightly push or pull the rifle to the left or the right upon ignition. The shooter wants a straight pull back on the trigger. HS Precision who manufactures synthetic rifle stocks makes a stock with an adjustable pull length. With rifles, the length of pull is measured by your own discression and what is most comfortable for you.
What you should know about your rifle barrel
As previously mentioned, free floating your barrel is an important aspect of accurate shooting. A free floated barrel allows for better cooling and aids in the maintenance of your stock. However there is more to your barrel than you might think.
Barrels are manufactured from either a chrome molly steel, or 416R stainless steel. Some come blued, sand blasted or coated with Teflon or other treatments, and some exotics come wrapped in Kevlar. I do not recommend fluting your barrel and here is what Shilen has to say, “Fluting a barrel can induce unrecoverable stresses that will encourage warping when heated and can also swell the bore dimensions, causing loose spots in the bore. A solid (un-fluted) barrel is more rigid than a fluted barrel of equal diameter.
All rifle barrels flex when fired. Accuracy requires that they simply flex the same and return the same each time they are fired, hence the requirement for a pillar bedded action and free floating barrel. The unrecoverable stresses that fluting can induce will cause the barrel to flex differently or not return from the flexing without cooling down a major amount. This is usually longer than a shooter has to wait for the next shot. The claim of the flutes helping to wick heat away faster is true, but the benefit of the flutes is not recognizable in this regard until the barrel is already too hot”. Whatever barrel you utilize, they all have several things in common; they all have “lands” as well as Harmonic Vibrations, and stress.
Lands
The lands are the raised areas between the grooves that are cut into the interior of the barrel, which allows the bullet to rotate down the barrel and spin as it leaves the muzzle. This aids in the stabilization of the bullet which in turn provides for better accuracy. There are three basic machining processes that barrel manufacturers use to machine the rifling into the barrels and are as follows.
Broach Rifling
The modern broach method of rifling uses a hardened steel rod with several cutting rings spaced down the rod. Broaches can be over 16 inches long and because they have several cutting rings, they are referred to as gang broaches.
Button Rifling
Probably the most common method used today to rifle barrels is button rifling. Button rifling uses a different approach to forming the grooves in the barrel. A button is a very hard steel plug that is forced down an unrifled barrel. The grooves are then formed in the barrel under very high pressure. The pressure created to form the rifling in the barrel hardens and polishes the inside of the barrel.
Hammer Forged Rifling
The newest mechanical method of rifling barrels is accomplished through a process called hammer forging. Hammer forging produces a type of rifling called polygonal rifling. A hardened steel mandrel is produced with the shape of the rifling formed on its outer surface. The mandrel is inserted into a barrel blank and the outer surface of the barrel is machine hammered. The hammering forces the barrel material down against the mandrel and the inner surface of the barrel takes on the shape of the mandrel. The mandrel is then removed from the barrel and the outer surface of the barrel is cleaned up. Just as in the other types of rifling, polygonal rifling can have different patterns. The most common polygonal patterns are 6/right and 8/right.
Electrochemical Rifling
In a process that eliminates the conventional machining of metal, rifling is formed by wet-etching the interior of a barrel under an electric current. The metal inside the barrel is actually eaten away or dissolved to create grooves in the barrel. An electrode (cathode) that has metal strips in the shape of the rifling is placed in the barrel (anode) and the assembly is submerged in a salt solution. An electric current is applied and the electrode is moved down the length of the barrel and twisted to create the spiral shaped grooves. As the current travels from the barrel to the electrode metal is removed by electrolysis thus forming the grooves in the barrel. This process creates the rifling in the barrel very quickly and does not require consumable tooling.
Harmonic Vibration
All rifle barrels have their own “sweet spot”. Just like a baseball bat or golf club. When the ball is hit on the right spot of the bat or club, it is a solid hit and the ball reacts by traveling further in the air. Your rifle barrel is similar as when the correct combination of powder and bullet are fired down the barrel, its sweet spot is found and the harmonic vibrations are less. Barrels with less harmonic vibrations produce less chatter when the bullet goes down the bore. It is smoother and stabilizes the bullet better. This is why some factory cartridges work better in your rifle than others and hand loads work the best. With hand loads you are able to experiment with different kinds of bullets, powders, and powder charges and oftentimes 2/10th of a grain of powder will make a difference in group size.
Barrel Stress
Most stock rifles come with production run barrels. These are not all that bad, however they have not been manufactured with the great care as the after market match grade barrels have. All match grade barrels have been hand lapped and some even stressed relieved. Not to mention that the holes are drilled as perfectly on center as possible. Some of these match grade barrel manufacturers are; Shilen, Douglas, Lilja, Schneider, Rock and Hart.
Steel expands 1 millionth of an inch for every one degree of temperature increase. When a non stressed relieved barrel begins to heat up, the steel begins to react. This causes slight changes in the barrel, causing it to shoot a different point of impact after about the third or fourth bullet is fired; and continues to change throughout the shooting session. In addition to the slight amount of warpage, your barrel is flexing each time the trigger is pulled and we want the barrel to flex back or return to its original point position. The process for stress relieving a barrel is Heat treating it, and that takes place in an industrial oven. The heat releases the stress in the metal by aligning the metal’s molecules.
Muzzle Crown
The crown of the muzzle basically protects the lands and grooves from being damaged. If you were to drop your rifle onto the front of the muzzle you could hypothetically chip or scratch them. This would or could cause the bullet to leave the barrel with an uneven burst of gas. This in turn would have a destabilizing effect on the bullet, making it less accurate.
You can now see how the components of your rifle begin to work together, and how important each factor is becoming. Right now is where some of you will say, “this is all too complicated and all I want to do is go out and hunt”. Perhaps you do not have time for all of this. But it basically comes down to owning a rifle that is just correctly built, and maintained. Maintenance is the easy part. You just check the torque settings; keep your rifle clean and in good operating condition. But you must first have a decent platform to work from. A well built rifle will shoot three rounds, ½” groups or less with factory ammunition at 100 yards. This in turn means that at 1000 yards, your groups (without the effects of wind) will be 5 inches. Realistically you should be able to hit within a ten inch pie plate or better. That is what you and your rifle are capable of.
There are several other factors that finish up this section. They include scope mounts, scopes and cleaning methods.
Scope Mounts
Scope mounts break down into two components: mounting rails and mounting rings. The rail that mounts on the top of the receiver can come in a one piece base or in two pieces. And the rings are available in many different fashions. I am just going to give you my opinion on this and skip the detail of other fabrications.
For the top rail, I like both the one and two piece bases although I use only the one piece on my rifles. Installation is easier, there is more room to adjust your scope and for other add-ons, that we will go over later on. The down side is that you cannot get your fingers into the open receiver from the left side of the rifle as easily. I thought that the one piece would be a hindrance however that has become more of a misnomer than anything else. I choose the “Badger Ordinance” twenty minute of angle, one piece base and their matching rings. High quality base and rings make a large difference and the Badger Maximized series of scope rings and rails are made to the highest tolerances in the industry.
Badger Scope Rings are machined from steel bar-stock and come numbered in serialized matched pairs. This assures that both rings are identical and eliminates the damaging effects of mismatched mass produced rings. Install poor quality rings on your rifle and you may find yourself with a broken lens inside your scope when attempting to mount it. Poor quality equipment is available everywhere at inexpensive prices. But poor quality equipment can lead to big problems down the road.
Here is one example: This last year a friend of mine purchased new rings for a new scope that he was going to be mounting on his new rifle. As he has had this as a project for quite some time he was pretty excited about it. He installed the new rings, torqued them to the required specs and then began to mount the scope. He placed the top half of the rings onto his scope and began to torque them down to the required twelve inch pounds of pressure. All of a sudden we both heard a crackling sound. I was pretty sure what it was and he began to panic. Looking through the scope all he saw was “white”. We removed the scope and rotated it, and heard the sound of broken glass. Looking down through the front objective you could actually see that one of the lenses inside had indeed shattered. This happened twice and was caused by a poorly matched pair of rings that had not been bore lapped with a poor quality scope.
When the rings are bore lapped they fit the scope tube perfectly and do not cause any of the unwanted effects such as the “bowing” of the scope tube or any unnecessary pressure on it. All of the scope’s assets work harmoniously and the parallax will not and should not stick. If it does, return the scope immediately.
Scopes are an interesting piece of equipment. Imagine what goes into building these things. Take Night Force for example. There are approximately eleven lenses throughout the body of the scope. They are hand assembled to strict tolerances by people here in the US who care a great deal about quality. Everything is fitted properly and the reticles are calibrated to perfection. This may be true with Night Force products, but is it true with other scope manufacturers?
The scope itself can be an asset or hindrance, and there are many times when I have gone out to the range to “test” and “qualify” a new scope that was coming out on the market where the turret adjustment click increments were not what they were suppose to be or the reticle was not calibrated correctly or it had a jumping zero and shot two different groups. In fact, I have actually experienced a problem where the front tube of the scope was five-thousands of an inch larger in diameter than the rear tube. When mounted into the rings, the scope “bowed” causing the parallax to stick which in turn caused a series of other problems to develop.
Through all of my experiences, I have found the flowing scopes to be of the best quality in componentry, quality and assembly. They are: 1) Schmidt Bender, 2) Night Force, 3) Leupold M4’s and 4) Hensholdt. At least these are the scopes that I have had experience with that lasted for years and did not fail. These are what I call professional grade and they will last, (in my opinion) a long time and will continue to work exceptional well. We will cover more on this subject later on in the book.
Don’t be discouraged at the pricing of some of this stuff. It can get up there. However once your rifle is established, you have made a tremendous leap forward. Now, there is just a little bit of information and practice that you will need to get yourself confident in longer range shooting. However, once you have your new rifle, you will need to properly break it in.
Breaking in and cleaning your rifle
Break-in procedures are as diverse as cleaning techniques. Shilen, Inc. introduced a break-in procedure mostly because customers seemed to think that we should have one. By and large, we don’t think breaking-in a new barrel is a big deal. All of Shilen’s stainless steel barrels have been hand lapped as part of their production, as well as any chrome moly barrel. Hand lapping a barrel polishes the interior of the barrel and eliminates sharp edges or burrs that could cause jacket deformity. It also polishes the throat. This, in fact, is what you are doing when you break-in a new barrel through firing and cleaning. Here is our standard recommendation:
Clean after each shot for the first 5 shots. The remainder of the break-in is to clean every 5 shots for the next 50 shots.
During this 50 shot procedure, don’t just shoot bullets down the barrel. This is a great time to begin load development. Zero the scope over the first 5 shots, and start shooting for accuracy with 5-shot groups for the next 50 shots. Same thing applies to fire forming cases for improved or wildcat cartridges. Just firing rounds down a barrel to form brass without any regard to their accuracy is a mistake. It is a waste of time and barrel life.
How do I clean my new barrel?
As with break-in and using coated bullets, you will find many diverse opinions on this subject.
Equipment
Cleaning Rods
Use a good quality “coated” cleaning rod with a rotating handle. The rotating handle allows the brush or patch to follow the lands and grooves. A non rotating handle forces the brush bristles to jump over the lands and grooves instead of following them.
Brushes
Use a good brass or bronze brush with a looped end. Do not use a brush with a sharp, pointed end.
Solvents
Every shooting product manufacturer has their own miracle solvent, and most do the job as advertised. I have been using Hoppes No. 9 for almost forty years. #9 is a carbon cleaner and will not remove too much copper fouling. To me this is ideal. However, if your rifle barrel does indeed stop shooting, a copper solvent by the name of 7.62 will remove all of it. This will allow you to start over by re-breaking in the barrel. Try it, you might just find that your shot out barrel isn’t shot out after all.
Bore Guides
Bore guides fit into the chamber area of the receiver. They guide the cleaning rod and prevent it from hitting the chamber, throat and bore. I highly recommended them.
Patches
Flannel or cotton patches work the best. Either trim or fold your patch to insure that it will fit snugly into the bore, but not so tightly you have to force it. Forcing a patch causes the rod to flex inside the bore of the rifle. If you are using a coated rod, this usually won’t hurt anything, but the uncoated stainless steel rods that some shooters use can batter against the inside of the bore and damage rifling.
Procedure
Once again, many different procedures abound. All accomplish basically the same thing. Here is ours: With the bore guide in place and the brass jag attached to the end of your cleaning rod, run solvent saturated patches down the bore of your barrel twice. Then, attach a tight fitting brass or bronze brush to your cleaning rod and slide the brush through the bore guide into the chamber with a twisting motion. Push the brush through the barrel until it comes out the end of the muzzle. Now pull the brush back into the chamber guide. This is one “cycle”. Make ten cycles. Now, fold or cut a patch for a snug, not too tight, fit; apply some solvent to the patch and push the patch all the way through the bore and out the muzzle. As you draw the rod back, the patch should fall off. Put on a dry patch and do the same thing until it is clean. Repeat the process with a patch as necessary. If you are through shooting for the day, lightly wet a patch with light viscosity machine oil such as “Kroil” to prevent or retard rust. Push this patch through the bore. Let it drop out the muzzle, and you are done.
How clean is clean?
A rifle barrel does not have to be spotless to shoot great. Many times more harm than good is done in trying to get it that way. Picture a car’s fender. If the fender has a small dent in it, then professional application of body putty fills the dent. When painted over, the dent becomes unnoticeable, and the surface of the fender is smooth and consistent. The same thing happens in a rifle barrel on a microscopic level. Removing this small trace of copper puts you right back to square one. The next bullet that crosses that area will, again, leave a small trace of copper. (Similar to patching a pothole). All successful bench rest shooters shoot one or more “fouler” shots down the barrel before going to the record target. This is not to warm up the barrel. They are resurfacing it on the inside. Bench rest shooters clean between relays to get the powder fowling out, not the copper. However, since copper usually comes out with the powder, they know that it must be replaced to get “back in the groove”.