Angle Shooting – Correcting For The Effects Of Gravity
There is a physical ballistic problem encountered when shooting on angles that causes the bullets point of impact to hit high. Shooting on angles is what every hunter experiences while hunting in mountainous terrain. Sheep hunters and deer hunters alike know all to well, that if their target is up or down on an angle, that they must aim low because the bullet will impact high. The reason for this has to do with gravity and the adjusted site height above the bore of the barrel.
When we zero in our rifle at 100 yards, we are shooting on a flat plane with the full force of gravity pushing down on the bullet. In order to zero properly and get the bullet to strike the bulls-eye, we need to adjust the sight height above the bore of the barrel for this particular condition, (shooting on a flat plane) so that when the bullet leaves the bore of the barrel it arcs up into the full force of gravity, and then drops down onto the bulls-eye.
However, when we shoot on an incline or decline (up or down on an angle) the force and effect of gravity is less on the bullet; but the sight height above the bore of the barrel remains the same, or adjusted for shooting on a flat plane.
Because of this, the bullet will have a flatter trajectory and strike the target higher than where our intended point of aim was. It is imperative that when we are shooting up or down on an angle that we eliminate the guesswork, and correct the straight line distance to the target or “sloped distance,” to the, corrected for gravity, distance to target.
Now, this is an easy adjustment; a simple equation that will put you very close to right on target. However there are three ways to obtain this and one is more accurate than the other.
The first method is called the field expedient “Rifleman” method. As an example, when a surveyor is shooting a mountain top for mapping purposes, he uses an instrument called a theodolite. The theodolite tells the surveyor the angle of his aim. His/her goal is to obtain the base of the triangle distance, or flat line distance. Hence, simple geometry comes into play. The surveyor notes the angle that he is holding at, then goes to his data book and obtains a cosine number of that angle, which he then multiplies to the sloped distance.
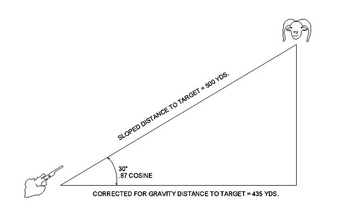
Here you can see the sloped distance to target equals 500 yards and the angle that the hunter is holding on is 30 degrees (cosine number of .87). To obtain the bottom leg of the triangle, you would multiply the cosine number of .87 to the 500 yards. (.87 X 500 yds. = 435 yds.) This gives you the corrected distance as if you were shooting on a flat plane, with the full force of gravity affecting the bullets path of flight.
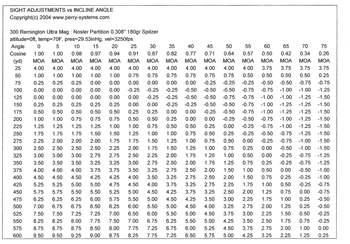
Below, referencing a .300 Remington Ultra Mag, utilizing a flat shooting 180 grain Nosler Partition bullet, with a velocity of 3250 feet per second, the uncorrected for gravity distance of 500 yards to target would cause the bullet’s point of impact (under the field expedient method) to hit approximately 13.2 inches high; or 1.75 minute of angle. Please see the Night Force ballistic Targeting Software Generated Angle Drop chart below.
To the average hunter, these trajectories, at first, may not appear to be significant, but as an experienced shooter you know that they are; and the angle that you will be holding on demands a correction. As an example, let’s say that your rifle shoots an average group size of one inch at 100 yards (large for a pro-grade rifle). At three hundred yards the group size could hypothetically open to three inches; at five hundred yards, five inches. So, if you are going to be thirteen inches high at 500 yards if uncorrected for gravity, then you can add an additional five inches to that, in any direction. This is not difficult to see; math is math and science is science and when the math is done correctly, one round will put one animal down.
Figure 3 – Angle Drop Table for the 300 Rem Ultra Mag
The U.S. Military as well as other Government agencies, train all of their Precision Marksmen on how to obtain the corrected for gravity distance to target. The original method of approach was to utilize a Protractor, string and paper-clip. The string was tied to the center of the protractor and weighted with the paper-clip. When the Marksman was aiming at his target, the protractor was held in place with the weighted string along the side of the receiver inline with the barrel. The Marksmen would then carefully grab the protractor and string, and obtain the angle that he was holding on. Then, the Marksman would go to his data book and obtain the cosine number, then do the math; very simple and very straight forward. Only today there is an easier, faster and more dependable method of obtaining the cosine number; and that is by using an “Angle Cosine Indicator” manufactured by “Sniper Tools Design Company.”
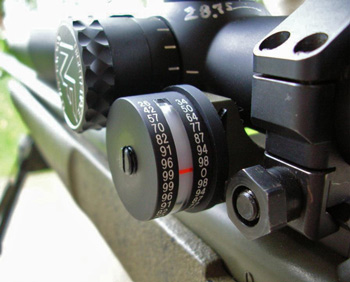
The Angle Cosine Indicator, (ACI), is a widely excepted method of obtaining the cosine number of the angle that the hunter is holding on, by all Branches of the U.S. Military and militaries throughout the world. It is a simple tool for hunters who hunt in mountainous terrain and is a vault solid precision instrument. It is manufactured from aircraft grade aluminum and anodized a flat black color. It fastens onto your rifle or your scope; either by a standard Weaver Base scope ring, or as seen in figure 4, by “Badger Ordnance’s” military specific picantinny rail mount. When the rifle is held on target, the “ACI” indicates the cosine number of that angle by means of a highly visible index mark; in addition, the cosine numbers transverse the body in five degree increments. The ACI is easily zeroed to your rifles bore by simply loosening the side screw and rotating the body until the zero cosine number sits inline of the index mark.
To install the Angle Cosine Indicator you will first need to decide on your method of mounting; either a Weaver base scope ring or a Badger Ordnance’s Picantinny rail mount. Once that is decided, you will level the bore of your barrel by placing a spirit bubble level on the inside rail of your receiver, which is where your bolt lugs ride on. Once the bore is level, install and zero the ACI, insuring that it is indeed level with the bore of the barrel and the zero cosine number is sitting ontop of the index mark. Once that is accomplished, you are ready to hunt. The following is the procedure for utilizing the ACI while in the field.
1) You spot your target. 2) Range / obtain the distance to your target by either utilizing a laser range finder or a ranging reticle. 3) Aim at your target and then look off to the side of your rifle at the Angle Cosine Indicator and obtain the indicated Cosine number. 4) Multiply the cosine number to the distance to your target, which will give you a corrected for gravity distance.
For example, 500 yards X .7 (45 degrees) = 350 yards. Now, look at your data card to obtain your hold for the 350 yard target distance, and adjust your turrets as specified. However, this is the least accurate method of the three.
2) In the second method of obtaining the corrected for gravity distance to target, the ACI still plays its role, however the cosine number is multiplied to the hold data from your “data card.” When I instruct angle shooting to my Students, I teach how to utilize Night Force Ballistic Targeting Software which is loaded onto a Pocket PC, to manufacture a data card. The procedure is as follows:
1. Utilizing a Kestrel hand held weather station, obtain the temperature, barometric pressure and humidity.
2. Input this data into the data entry points of the software.
3. Pick the “Drop Table” button.
There is a little bit more to this than what I have mentioned, however this procedure produces an electronic data card with distances in one, five, ten, twenty, twenty-five and fifty yard or meter increments; your choice. I then have the Students copy this data card over to small “write in the rain” notebook paper. Then, place the Pocket PC back into their pack and either tape the card to their stock or place it in their jersey pocket. While in the field and after obtaining the distance to target, the data card is reviewed, and the cosine number is multiplied directly to the hold, as depicted on the data card. This method is more accurate than the “Rifleman” method and is called the “Improved Rifleman” method. Looking above at Figure 3, if the target is at 500 yards, the hold for that distance is 7 moa. If you were aiming at a 45 degree angle, the cosine would be .7 and the calculation would be as follows: .7 X 7moa = 4.9 moa.
However the most accurate method is to input your meteorological data, (temperature, barometric pressure and humidity) directly into the “Night Force” ballistic targeting software. This is because the software takes into account the fact that the bullet has its own unique velocity, ballistic coefficient, time of flight, and deceleration curve. Utilizing this software can be as much as eight minute of angle more accurate then the Rifleman method and eliminates the guessing game once associated with angle shooting.